
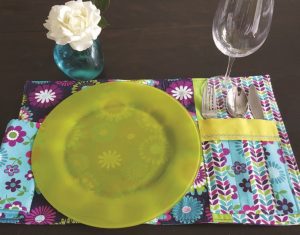
Picnic Table Placemat With Cutlery Pocket And Napkin
Skill Level: Intermediate
Finished Measurements: Placemat: 20” x 14”. Pocket 5” x 6”
Cutting & Sewing Time: 2 hours
This is a quick and easy project to practice your free-motion quilting—AND create awesome placemats that are perfect for outdoor summer dining. This project uses Brother’s new Free-Motion Kit for the PRS100 to create a colourful placemat with stipple stitching. In no time at all, you’ll stitch up a complete set of placemats and napkins.

Materials and Supplies
• THE Dream Machine—Brother XV8500D Combination Sewing, Quilting & Embroidery machine
• ¼” Brother Piecing Foot-Guide (model #SA185)
• Brother PRS100 with Free-Motion Kit (PRSFMK1C)
• Assorted coordinating fabric (1 yard)
• Batting (22” x 15” piece)
• Thread
• Ruler
• Fabric or marking pencil
• Rotary cutter and mat
• Scissors
• Iron/ironing board
Cutting of Fabric
Placemat Materials
From each fabric cut:
1 – 22” x 14” rectangle of fabric (back of placemat)
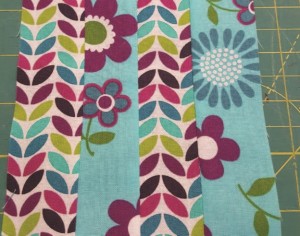
1 – 15” x 14” rectangle of fabric (part A of placemat) 1 – 6” x 14” rectangle of fabric (part B of placemat)
1 – 2” x 14” strip of fabric (part C of placemat)
4 – 1.5” x 16” strips of fabric (pocket of placemat)
1 – 3.5” x 6” strip for flap of pocket
1 – 22” x 15” rectangle of batting
Napkin Materials
18” square of fabric for the napkin (prewash and iron fabric)
Creating the Napkin
1. On the wrong side of napkin fabric square, use a disappearing fabric marker to mark each corner 1” up, and 1” in, from the edge. Place a dot. Mark a diagonal line from corner to corner.
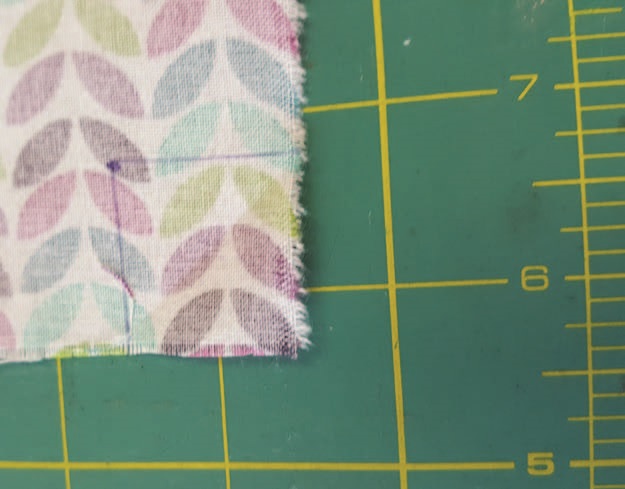
Place a dot 1” from the corner
2. Fold each corner into dot mark.
3. Fold each corner again, bringing the first fold line up to meet the dot mark.

Fold the corner.
4. Fold and press each side edge of the napkin about ½”.
5. Fold and press each edge of the napkin up another ½” so that the corner lines up at a diagonal.
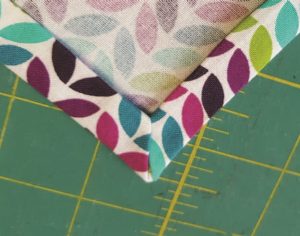
Align the corners.
6. Adjust the sides and press well, so the corners align (pin if desired).
7. From the right side of the napkin, stitch ¼” around the outside of the napkin.
8. Press.
Placemat
1. Refer to cutting instructions.
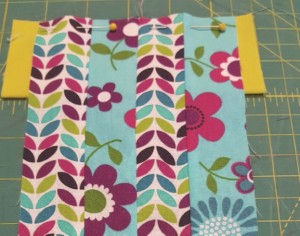
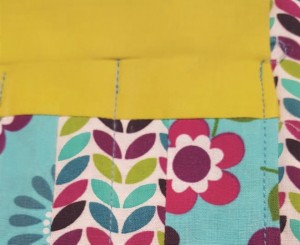
2. Stitch Part A fabric to Part C fabric.
3. Stitch Part A/C fabric to Part B fabric, creating the top of the placemat.
4. Layer placemat top and batting.
5. Select free-motion option on the PRS100.
6. Stipple stitch Part A of the placemat.
Prepare and place the pocket
1. Stitch the long sides of the 1.5” x 16” strips together to form a rectangle for the pocket.
Stitch the long sides of the strips together.
2. Layer wrong side of pocket on top of right side of pocket flap.
3. Stitch the top seam.
Stitch the top seam.
4. Fold bottom of pieced pocket in half, right sides together, to form a piece 6” x 8”.
5. Stitch the right and left sides of the pocket (leaving top open).
6. Turn right-side-out.
7. Fold in ¼” on each side of the flap.
8. Layer wrong side of pocket on top of the right side of the pocket flap.
9. Place the pocket on the right side of the placemat in the bottom right corner. Pocket should be placed 1½” up from the bottom raw edge and 1½” in from the right raw edge. Pin in place.
Be careful not to stitch through the flap!
10. Stitch along both sides and across the bottom, leaving the top open.
11. Fold pocket flap to the right side, press.
12. Select a decorative stitch and stitch ¼” from edge of pocket flap.
13. Position pocket on placemat.
14. Stitch in place on left, right and bottom side of pocket, 1/4” from edge of pocket.
15. Using a disappearing marker, draw a line 2” from left side of pocket and 2” from right side of pocket.
16. Stitch. Do not stitch through the flap.
Assemble the placemat layers to finish
1. Place the top and bottom layers of the placemat, right sides together.
2. Using a ½” seam allowance, stitch around all four sides. Leave a 4” opening along the bottom for turning.
3. Trim corners on the diagonal. Turn placemat right-side out.
4. Use a chopstick or pencil to gently push out the corners to be nice
and square.
5. Press well, pressing in the raw edges of the opening so they are flush with the sewn seam.
6. Pin the opening closed.
7. Topstitch around all four sides, using a ¼” seam allowance.
Set your table and ENJOY!
About Lynn Swanson
Bringing her undeniable passion to everything she does, Lynn Swanson is an enthusiastic quilter, sewer, embroiderer and crafter who explains her projects in a fun and easy way. Lynn’s eagerness to embrace new technology has made her a treasured resource for teaching crafting and sewing fanatics everything they need to know about Brother machines and design software as one of Brother’s educators. Check out her tutorials and catch her creativity bug!You Might Also Like
Sewing:Dinosaur Costume

Embroidery:Valentine’s Day Baby Onesie