
Drawstring Lingerie Pouch
Your delicate lingerie deserves this awesome, elegant lingerie pouch! Quick and easy to make, it’s perfect for storing your delicate items at home. Plus, it makes a wonderful travel case!
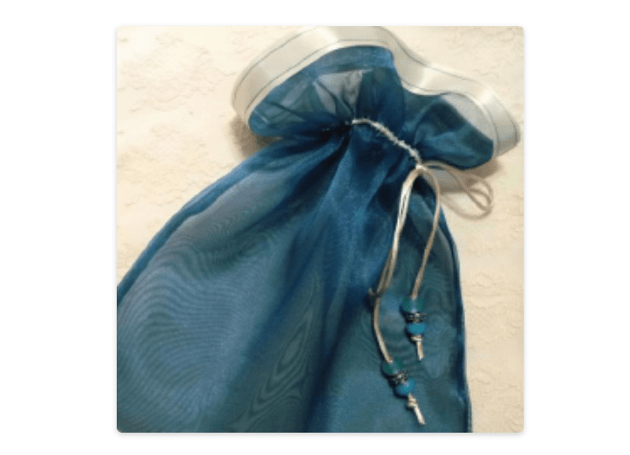
This lovely project uses the Brother Pearls and Sequins foot, great for attaching satin cording for a drawstring on a sheer organza pouch. You’ll learn a neat technique for finishing the organza with satin ribbon trim for an elegant touch at the top edge.
Materials
• Brother Sewing Machine with 7mm capability
• SA150 Brother Pearl and Sequins foot, 7mm
• Sharp scissors
• Fine, sharp pins
• Fine, sharp sewing needle for sewing fabric
• 1 piece of sheer synthetic organza, 14” wide X 28” long
• 2 pieces of contrasting satin ribbon measuring 1” wide X 15” long to finish top of pouch
• Wash-out marker or chalk suitable for marking organza
• 2 yards of narrow, round satin cording for drawstring (commonly called “rattail cording” and measures about 2mm in diameter)
• 1 spool of good quality Brother thread to match sheer organza fabric
• 1 spool of good quality Brother thread to match satin rattail cording
• Optional: Assorted beads to decorate ends of rattail cording
Fabric Notes:
Take care when pressing heat sensitive synthetic organza. Test on scrap fabric to determine heat setting before pressing your project. Important: This fabric doesn’t have a noticeable right and wrong side. When stitching ribbon, simply press ribbon to one side. Use this as the right side consistently as you complete the project.
MORE ABOUT BROTHER’S SA150
This foot is great for adding a little glitz to your projects. It’s clear for added visibility and features a groove for even feeding of pearls, sequins, and rounded cords. Simply place your embellishment choice under the foot and into the guide to stitch onto your base fabric.
INSTRUCTIONS FOR FINISHING TOP EDGES
Step 1
Set up your sewing machine with thread matching or contrasting with ribbon. To finish the first top edge, pin a 15” piece of ribbon along one of the 14” edges of sheer fabric. Make the long edge of the ribbon even with the raw edge and leave a small amount of ribbon at each end.
Step 2
Select a straight stitch and attach the ribbon by sewing 1/8” from the edge, opposite the raw edge (See Figure #1). Note: Sew slowly to keep the ribbon and fabric from shifting. Remember to remove pins as you stitch.
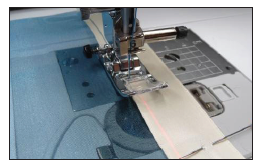
Figure #1
Step 3
Use scissors to carefully trim approximately 1/8” of sheer fabric from the unstitched edge.
Step 4
To finish off the top edge, fold and press ribbon toward the right side. Stitch along the remaining long edge (See Figure #2.)
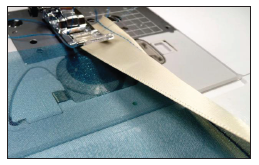
Figure #2
Step 5
Repeat steps for sewing ribbon to finish the remaining 14” raw edge. Make sure the ribbon finishes on the same side as the previous ribbon-trimmed edge. Trim ribbon at outer edges, making sides even.
Step 6
Use a French seam technique to sew the side seams as follows:
• Fold the rectangle with wrong sides together and the ribbons matching at the top edge.
• Sew along each side using a ¼” seam allowance ( Figure #3).
• Trim seam allowance to slightly less than ¼”.
• To finish the seam, fold and press it so the right sides are facing, and the narrow seam is sandwiched between the fold. Stitch the seam a second time using a 3/8” seam allowance (Figure #4).
NOTE: Brother’s SA538’s adjustable seam guide is ideal for sewing accurate seams.
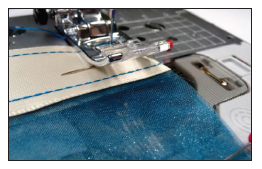
Figure #3
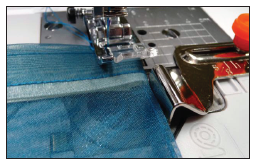
Figure #4
Step 7
Turn bag right-side out and press. Tack down seam allowances at the top edges, pressing seams toward one side. Topstitch through the ribbon and seam allowance (Figure #5a and Figure #5b).
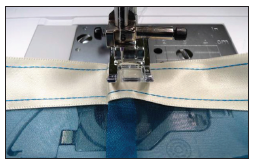
Figure #5a

Figure #5b
Step 8
Prepare to stitch cording as follows:
• Switch machine to sewing with the free arm.
• Attach the pearl and sequins foot and thread machine to match cording.
• Select a zigzag stitch (width: 7.0mm, length: 2.5mm).
• Use a wash-away marker or chalk pencil to mark a line measuring a distance of 3” from the ribbon-trimmed top edge.
Step 9
Slip the bag over the free arm. Beginning at one side seam, loosely pin the cord under the foot. Line it up with the marked line with about 6” of loose cord behind the foot. Position the cord under the foot (Figure #6.)
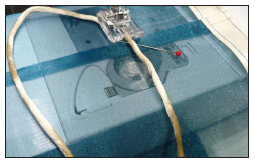
Figure #6
Step 10
Zigzag over the cord, smoothing it as you go. Cover the marked line as you stitch (Figure #7).
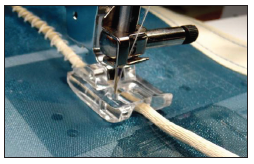
Figure #7
Step 11
Stitch cording across the top of the bag, stopping a slight distance from the point where you began.
NOTE: It’s important that the stitch forms over the cord and doesn’t catch any of the cording. Be sure to tie off threads at the beginning and end, and leave a slight gap between your starting and stopping points.
Step 12
Attach beads to the ends of the cords (if desired) and securely knot ends. You’re done!
Options and Ideas:
• Adapt these instructions to experiment with changing the finished size of the bag to hold different garments.
• The drawstring pouch is a great gift—and wow is it versatile! You can make it from loads of different fabrics, and add a personal touch by changing the trim at the top.
Designed exclusively for you by the Brother Education Department
About Brother
Brother shares your passion, so, we’ve created this blog as a place where you can find inspiration from our many exciting sewing, quilting, embroidery, cutting and crafting projects. We develop tutorials that range from beginner to expert so there’s something for everyone’s specific interests and skills. Try something new, today!You Might Also Like
Sewing:Easy Makeup Roll Case

Crafting:Spooky Door Hanger