
Modern Heirloom Pillow
I love giving pillows as gifts, especially for weddings. They’re quick, fun and easy to make. And they add a personal touch that you simply can’t buy in a store. Plus, they’re a great way to kick up your home décor!
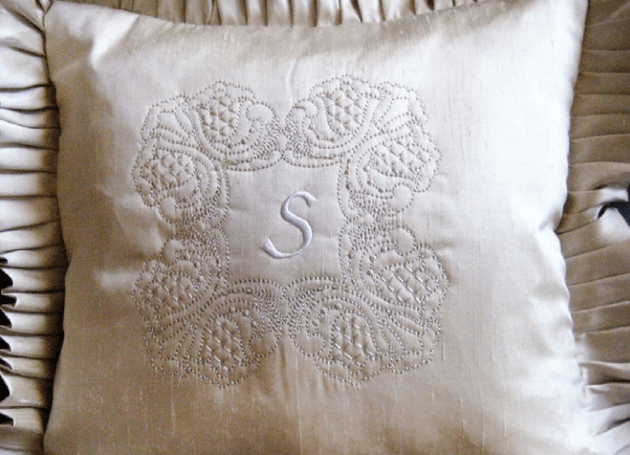
This past summer, we attended two weddings. Part of our wedding gift to the newlyweds was a custom-made pillow with their monograms and wedding colours. I made them using the Brother Q-Series 3500D’s large built-in embroidery designs. Both couples loved them.
In my role as a Brother Educator I get to learn, use and train others on all the Brother sewing, serging and embroidery machines. The NQ3500D (what Brother calls “The Fashionista”) is one of my absolute favourites! I love it for a lot of reasons, including its ease of use, colour LED touchscreen and large hoop size—not to mention its incredible range.
Top Six Pillow Making Essentials
I’ve come to consider the NQ3500D as my first go-to machine for sewing projects. Here are six of the Fashionista’s amazing features that make sewing pillows a breeze:
1. 6” x 10” Embroidery Hoop. This hoop, which comes with the NQ3500D, allows you to stitch nice, big embroidery designs without re-hooping. I was able to embroider all of my pillow designs in one hooping without stopping to reposition my hoop. Bigger is better!
2. Needle Down Pivot. It’s like having a third hand. When you select the needle down position, the needle stays in the fabric, and the pressure foot raises when you stop sewing. This allows you to pivot around corners or reposition your fabric without your fabric slipping away.
3. AHA feature. AHA allows you to smoothly sew over multiple layers of fabric or seams without any change to your stitch size or length.
4. Touch LED Colour Screen. The LED screen lets you clearly see and select your decorative stitch, straight stitch or embroidery design. Once selected, your embroidery design appears in colour on the screen, giving you a really clear picture of what it will look like when you stitch it out.
5. Ruffler Foot. I used this foot to add an updated modern touch to the heirloom look of these pillows. The Ruffler Foot allows you to stitch a continuous gather, or gather a pleat, every 6 or 12 stitches. I just love the knife-edge pleats I created using the every-6-stitch option. And you can pleat fabric and attach the pleats in one step, saving time and effort. (You have to buy it separately.)
6. Zipper Foot. For a more tailored look, I used piping to edge the pillows. Although there are piping feet available, you can easily attach piping using a zipper foot.
Materials and Supplies
• Brother Q-Series NQ3500D Sewing and Embroidery Machine
• Brother embroidery thread to match fabric
• Sewing thread and bobbin thread
• Fabric for front and back of pillow top
• 1 piece of fabric 13” square for the front of the pillow
• 2 pieces of fabric 17” wide by 13” long for the back of the pillow
• 1 piece of fabric 4” x 96” for knife-pleated ruffle
• 1 piece of lightweight quilt batting 13” square
• Brother Iron-on stabilizer (model #SA519) to stabilize one 12”
fabric square
• 12” pillow form
• Brother Ruffler Foot (model# SA143)
Instructions
1. Fuse stabilizer to the wrong side of one of the 13” squares. Set up the machine for embroidery and select Design #52 or #54.
2. Centre the fabric in the hoop and hoop fabric, stabilizer and quilt battingin the large 6” x 10” hoop.
3. Embroider design in the centre of the pillow front piece. (See Figure #1a) (I added a monogram letter from built-in Alphabet 04 to the centre of Design #52.) (See Figure #1b)
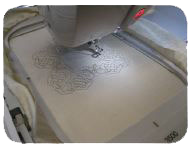
Figure #1a: Stitch out your embroidery design.
Figure #1b: Embroidery design complete with monogram added.
4. Remove from hoop and tear away excess stabilizer.
5. Change machine to regular sewing.
6. Fold fabric for knife-edge pleat in half lengthwise with wrong sides together. Press.
7. Attach ruffler foot to machine. Be sure your needle is in the centre position and is directly above the hole in the ruffler foot. Tighten the screw on the ruffler foot to securely fasten the foot in place.
8. Set ruffler foot to 6 stitches per pleat. (See Figure #2) Place fabric to be ruffled between the forks on the ruffler foot. Align the right edge of fabric (raw edge) to be pleated with the right edge of ruffler foot. Stitch slowly. Note: You can save a step here by pleating your fabric and attaching it to the pillow top at the same time! To do that, place the pillow front right-side-up under the ruffler foot. Place the fabric to be pleated between the blades. Stitch.
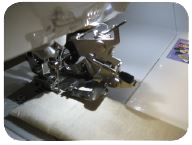
Figure #2: Ruffler foot set to 6 stitches/inch.
Note: You can save a step here by pleating your fabric and attaching it to the pillow top at the same time! To do that, place the pillow front right-side-up under the ruffler foot. Place the fabric to be pleated between the blades. Stitch.
9. If you’re attaching your ruffle as a separate step, remove the ruffler foot and replace with the “J” foot. With right sides together, stitch the pleated fabric to the pillow front. (see Figure #3a) Ruffle should be facing the inside of the pillow front. Sew a ½” seam.
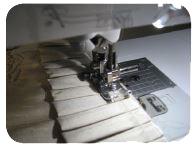
Figure #3a: Right sides together, stitch ruffle to pillow front (using “J” foot).
10. Select back pieces. Prepare each piece by folding in half with wrong sides together and 13” edges matching. Layer the two panels over the right side of the pillow front, overlapping the folded edges to create an envelope for the back. (See Figure #3b)
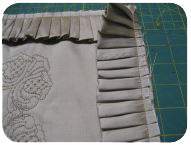
Figure #3b: Ruffle attached to pillow front.
11. To finish, sew the pillow front and back together using a ½-inch seam allowance. Trim corners, turn right-side out. Press. Insert pillow form.
You’re done! Now that you’ve finished your first pillow present, they’re sure to be in-demand from all your friends and family.
You’ll never have to search for a present idea again!
About Lynn Swanson
Bringing her undeniable passion to everything she does, Lynn Swanson is an enthusiastic quilter, sewer, embroiderer and crafter who explains her projects in a fun and easy way. Lynn’s eagerness to embrace new technology has made her a treasured resource for teaching crafting and sewing fanatics everything they need to know about Brother machines and design software as one of Brother’s educators. Check out her tutorials and catch her creativity bug!You Might Also Like

Sewing:Sideways Sewing Is Real? You Betcha!
Embroidery:Easter Egg Placemats